![]()
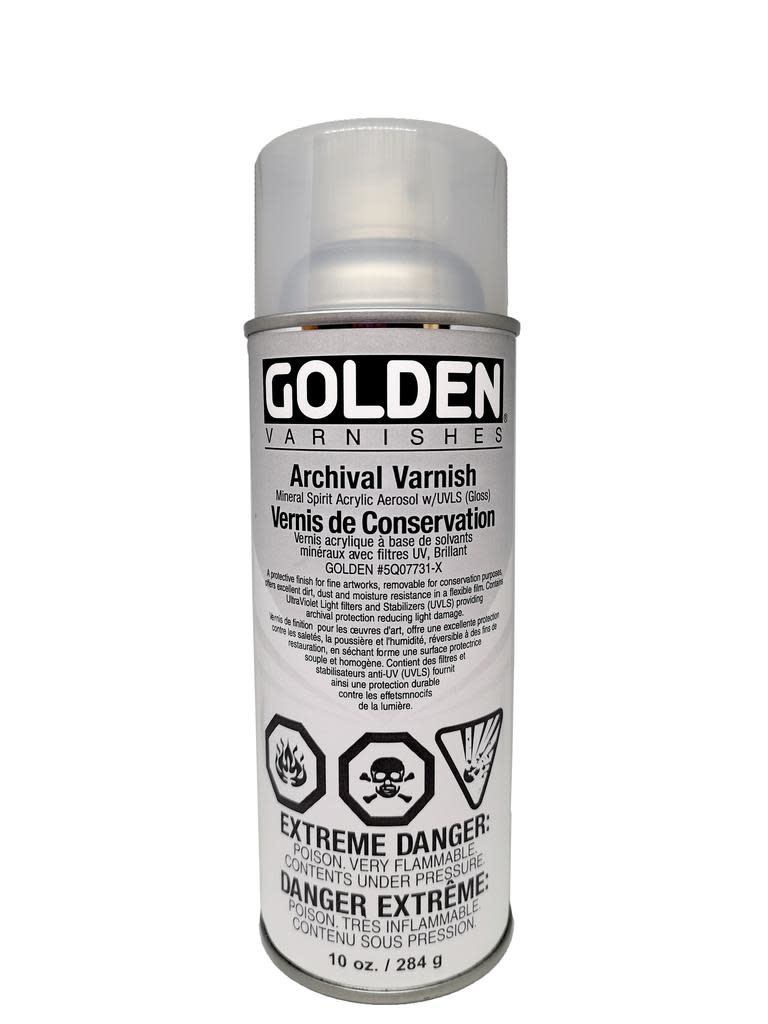
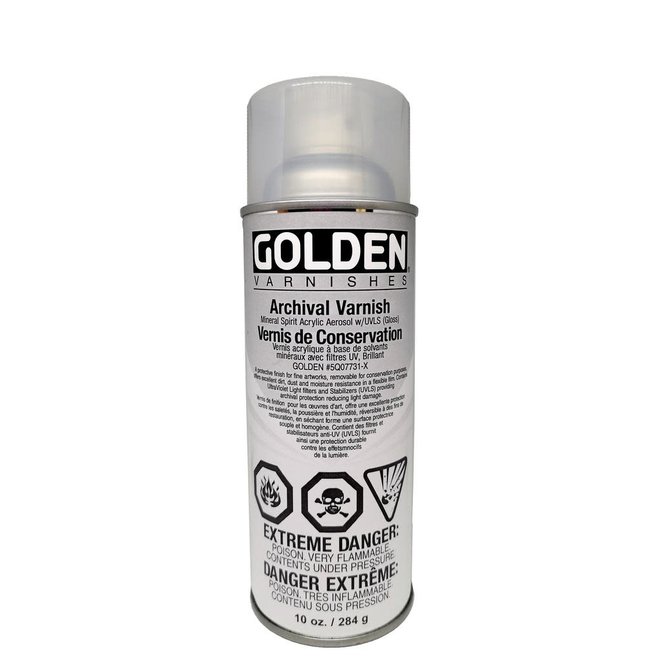
Archival Aerosol Varnish MSA with UVLS is formulated with 100% solvent-based, reversible acrylic co-polymer resin. It is an easy to use spray varnish made with fast drying acetone and a propellant. Properly applied, it creates a durable, even film with the same features as GOLDEN brushable MSA varnish plus, excellent wet/dry state clarity. It resists changes in appearance, remains flexible. It has an adjustable fan spray tip for precise application and reduced overspray. Available in Gloss, Semi-Gloss, Satin and Matte. Removable for conservation purposes.
GOLDEN Archival Varnish can be used over a wide variety of paints, including acrylic, oil, alkyd, watercolor, and casein. Formulated with 100% acrylic resins, it produces a flexible, clear film to protect against environmental concerns such as ultraviolet light, dirt and moisture. The coating is removable and resistant to yellowing.
GOLDEN Archival Varnish Mineral Spirit Acrylic Aerosol w/UVLS is made by reducing standard GOLDEN MSA Varnish (w/UVLS) with fast drying acetone and a propellant to create an easy to use spray product. Properly applied, it can create a durable, even film.
GOLDEN Archival Varnish should adhere well to most non-oily surfaces. It may exhibit poor adhesion to fresh oil paint films or if residual surfactants are present with water-based paint films. It has excellent wet and dry state clarity. Over time, the MSA film resists changes in appearance and remains flexible. The UV protection is achieved from a blend of Hindered Amine Light Stabilizer (HALS) and an ultraviolet absorber (substituted benzotrizole compound). The unique adjustable fan spray tip allows precise application with reduced overspray. Coverage is approximately 30-35 sq. ft. per can.
Prior to actual use, it is very important to experiment with Golden varnishes on test pieces to become aware of how they perform and how they alter the surface appearance of paintings. For best results, apply to a test piece that is similar in composition as the artwork to be varnished. This will help ensure that all variables are accounted for, and a successful varnish application will be achieved.
Applying an isolation coat before varnishing is only recommended for acrylic paintings. Do not use an isolation coat on oil paintings.
On acrylic paintings an isolation coat is helpful if future conservation or varnish removal is ever needed. It is a permanent, non-removable coating that serves to physically separate the paint surface from the removable varnish. This will help protect the surface if the varnish is ever removed and make future cleaning and conservation easier to avoid working directly on top of the pigmented part of the work. Therefore, even if painted with delicate washes or large areas of colors that could potentially bleed, a clear barrier would safely cover the painted surface. It will also seal absorbent areas, which will result in a more even application of the varnish. In the event that no varnish gets applied, the isolation coat serves to decrease the water sensitivity of the paint surface, affording protection during routine cleaning/dusting.
Given the current state of conservation science, we feel the use of an isolation coat provides the most protection. However, isolation coats are also significant and permanent additions to a painting and inevitably will cause changes in the painting"s surface qualities. Whether these changes are acceptable is an aesthetic decision that each artist needs to make after sufficient testing. In addition, since it is non-removable, any mistakes or problems during this procedure cannot be easily corrected and there is always an element of risk that needs to be considered. We strongly encourage the artist to practice these procedures thoroughly so they feel confident and become familiar with any unforeseen problems. If you have any questions or concerns regarding the proper use or application of an isolation coat, please call or email Golden's Materials and Applications Department: [email protected] / (800) 959-6543.
For brush application, the appropriate isolating medium can be made by diluting Golden Soft Gel Gloss with water (2 parts by volume Soft Gel Gloss to 1 part water). If a spray application is desired, a 2:1 mixture of Golden GAC-500 to High Flow Medium can be applied with an airbrush, touch-up spray unit or commercial spray equipment. The absorbency of the surface will dictate the number of isolation layers required. For relatively non-absorbent surfaces, as is the case with a uniform paint layer, one coat brush applied or two coats spray applied are recommended. For more absorbent surfaces, which tend to be very matte, it is recommended to apply sufficient isolation coats to achieve a satin sheen on the surface. This may require two or more brush applied coats or three or more spray applications.
The isolating layer is of critical importance when applying a matte varnish over an absorbent surface to prevent a cloudy or "frosted" appearance from occurring. This frosted appearance results from the varnish and solvent being absorbed into the support, while the matting agent remains exposed on the surface. While we have carefully selected the matting agent that is in Golden varnishes to be as transparent as possible, it is still a dry particulate material. When the matting agent is deposited onto the surface, and is not a part of a continuous varnish layer, it appears as a white solid. If varnishing water-soluble paints, including watercolor, gouache and tempera, the isolation coat must be sprayed on in very light layers to avoid solubilizing the paints, which could cause loss of distinctness of the underlying image.
Different paints and substrates have unique circumstances. GOLDEN Archival Varnish w/UVLS should be used in accordance with these individual requirements. ALWAYS TEST ON SCRAP PIECES OR INCONSPICUOUS AREAS BEFORE USE ON FINAL ARTWORK. Absorbent substrates require several gloss layers to seal the surface. Listed below are general application guidelines for common substrates. For more thorough information regarding specific media concerns, review artist handbooks and other information sources.
Acrylic Paints – isolation coat(s) should be applied as per MSA Varnish directions located in the main GOLDEN Varnish document. Allow 24 hours for the final isolation coat layer to cure and then build layers of Archival Aerosol Varnish w/UVLS as needed.
Oil Paints – allow minimum curing time of 6-12 months before using as a final picture varnish. Always start with light layers of Gloss to seal the surface and even out absorbency then build layers of desired sheen as needed.
Graphite/Pastels/Colored Pencil/Marker/Watercolor/Gouache – due to the varying effects and changes that can occur when using the Archival Spray Varnish over Pastel, various drawing media, Watercolor and Gouache, it is recommended that you do NOT use it for fixing, top coating, or varnishing these mediums, unless first testing and experimenting thoroughly.
The effects and changes noted above are primarily a darkening of the work due to changes in the nature of the surface and consequently, the refractive index. While there may be ways to fine tune the process by using a combination of satin or matte varnish over an initial gloss coat, or very light coats of varnish, we feel that the significant darkening observed in many cases, may constitute unacceptable changes for many artists.
If deciding to continue with this varnish application, both the media and the substrate should be taken into consideration. Test all brands and colors to avoid bleeding or darkening of colorants. Begin by applying very light coats of gloss varnish as a fixative. Once enough light layers create a dried glossy film, begin layers of desired sheen in subsequent coats.
Ink Jet Prints – generally, GOLDEN Archival Varnish w/UVLS may be applied directly to prints; however consider substrate absorbency (see above notes) and intended level of protection (refer to UV protection section below). Several thin coats are sufficient for moisture resistance, but testing should be conducted if water-based gels are going to be applied over the varnish for brush-stroke texture.
GOLDEN Archival Varnish contains Ultra Violet Light Stabilizers (UVLS) to protect materials from damaging light sources. However, spray coats are very thin compared to brush coats. The amount of varnish above the substrate and colorants is directly related to the level of UV resistance and the degree of fading due to light sources. When UV protection is required from this product, allow time to build up multiple coats. Testing shows 6 Archival Varnish w/UVLS coats are required to impede color shift of fugitive materials. When multiple spray coats are impractical, consider brush applying 2 or more coats of GOLDEN MSA Varnish (Gloss) if considerable UV protection is critical. After sufficient coats are built up, use GOLDEN Archival Varnish to develop the desired sheen. Refer to GOLDEN Information Sheet "Protecting Computer Generated Prints from U. V. Rays" for further instructions.
Becoming proficient in varnishing requires practice. Before varnishing important work, practice on a similar piece until satisfactory results are achieved. For the most even application, carefully spray light coats, developing a desired thickness. It is unnecessary to apply singularly thick coats to achieve an even finish, as each layer reactivates previous layers and forms a continuous film.
Irregular appearances can be the result of several issues:
GOLDEN Archival Varnish w/UVLS requires properly applied layers; each spray coat carefully and lightly developed, and it is not uncommon for the initial layers to have an incomplete looking film. Practicing is key to know what to expect during varnishing. If a layer is misapplied, there may be ways to correct it, but there may be instances where removing the varnish is required. Understand what caused the inconsistencies and take proper action before proceeding with additional coats.
Excessive single film building (vertical and angled applications) can result in runs forming in the varnish layer. Avoid heavy single coat films whenever possible. The remedy for fixing runs is to recoat the work when it's laid down on a horizontal surface and allow the solvent to reactivate and level the run. Varnish removal may be required in extreme cases.
A spattery dried surface is usually caused by:
In most cases, subsequent coats applied correctly should even out the surface.
Substrate was still too absorbent when Satin or Matte Varnish was applied resulting in the matting agents remaining exposed on surface. Allow the coat to dry, and apply a gloss layer to return clarity. Apply additional gloss layers if the surface still appears to be absorbing varnish. Once the surface is sealed with gloss, return to applying desired sheen coats.
Surface defects are usually caused by a contaminated surface. Minor occurrences may be corrected by subsequent recoats, however significant contamination must be addressed by removing the varnish and properly cleaning the surface with an appropriate solvent. Once the contamination is eliminated, re-varnish.
Applying multiple coats of varying sheens may result in the development of tiny cracks or fissures. These are normally caused by force drying layers or applying the last coat before the underlying layers have sufficiently cured. Wait for all layers to fully dry and begin applying lighter coats until fissures have subsided. Extreme cases may require complete varnish removal.
The Materials and Applications Department is available to answer questions by calling (800) 959-6543 or by emailing [email protected].
Removing a varnish is a very consequential process that should not be taken lightly, as the appearance of the artwork can be changed or damage could result from improper handling. The task is often best left to a professional conservator, particularly with works of special significance or unknown composition. However, there are times, as when something has gone amiss in the application, that it may be appropriate for the artist to do the work.
Golden MSA Varnish films remain soluble in such solvents as full strength, commercial mineral spirits, rectified or distilled turpentine, acetone, benzene, toluene, naphtha and some alcohols and esters. However, many of these solvents can damage the acrylic paint, and are not recommended for removing varnish from paintings. The solvent of choice should be full strength mineral spirits (white spirits). Avoid using low odor or odorless mineral spirits.
For best results always use GOLDEN MSA Solvent
If MSA Solvent is not available, a full-strength commercial mineral or white spirits might be useable but must always be tested prior to use. The test is a relatively simple process. First, make sure the temperature of your workspace and all materials are above 60° F (15. 5° C) Using a glass container to facilitate examination, mix an equal amount (1:1) of varnish and solvent, stirring with a palette knife. If compatible the varnish will quickly and easily go into solution and have excellent clarity. If the solvent is too weak or otherwise incompatible, you will usually see one of the following:
If the mixture fails on any of these points first double-check that the temperature of the room as well as all the materials are above 60° F (15.5° C). Some solvents we tested showed signs of failure when used at lower temperatures and were resolved by allowing the materials to reach the recommended levels. If problems still persist, adding a small amount of Xylene can usually solve the issue. In our own testing, as little as 1% addition was enough to correct most problems in even those mixtures that had clearly failed; however it is always possible one could need more depending on the brands used and the ratio of solvent to varnish. Please Note: Use of Xylene posses additional health and safety concerns. Please follow all health and safety warnings as provided by the solvent manufacturer.
Before embarking on a varnish removal mission, carefully consider the materials that are to be used, and how they can be used in a safe, controlled manner. Varnish removal requires the use of solvents, thus requiring proper personal protective equipment. Such equipment includes, but is not restricted to, appropriate respirator, impervious gloves and aprons and chemical splash goggles or face shield. Careful inspection of the labels on the solvents to be used should aid in determining your safety needs. Also, work in an area with adequate ventilation and guard against ignition sources and high temperatures, which could cause vapors to ignite.
First, test the solvent on a small area of the painting , or preferably on a test piece, to determine its effectiveness at dissolving the varnish. Another quick check may be made by mixing the solvent into the wet varnish. If the varnish becomes thinner, the solvent is compatible. If the varnish gets cloudy and/or thicker, the solvent is not compatible and should be avoided. Unfortunately, there is no way of knowing without trying.
A good procedure for removing the varnish is to start with a soft, low lint cloth (50/50 cotton/polyester T-shirt material works well). Saturate this cloth in solvent and lay over an area of the varnished surface. If possible, work with the painting in a horizontal position, on a table or floor. If the work must be done vertically, as on a wall, a method would have to be devised for keeping the saturated cloth in contact with the varnished surface. In either case, to minimize solvent evaporation, use a plastic sheet to blanket the saturated cloth.
Work in areas no larger than 2 square feet per application . Larger areas tend to become cumbersome and make thorough varnish removal difficult. Allow the saturated cloth to lie on the painting for 2-5 minutes. Then, remove the cloth and use a clean solvent-dampened cloth to gently pat the surface to remove the varnish. Excessive force may damage the paint layers below the varnish. Repeat this process until the entire painting surface has been treated.
After a single treatment over the complete surface of the painting, some residual varnish may remain. This may be indicated by an extremely tacky or gummy surface. Repeat the procedure, and continue doing so until the varnish has been sufficiently removed. Proceeding with more solvent exposure may result in some swelling of the paint layer.
The solvent soaked cloth and leftover solvent should be handled and disposed of carefully. Never pour solvent down the drain. Small quantities can be allowed to evaporate. Larger quantities can be saved for reuse or treated as hazardous waste. The cloth should be allowed to dry completely in a well-ventilated area before disposal or putting into storage for another use.
The above information is based on research and testing done by Golden Artist Colors, Inc., and is provided as a basis for understanding the potential uses of the products mentioned. Due to the numerous variables in methods, materials and conditions of producing art, Golden Artist Colors, Inc. cannot be sure the product will be right for you. Therefore, we urge product users to test each application to ensure all individual project requirements are met. While we believe the above information is accurate, WE MAKE NO EXPRESS OR IMPLIED WARRANTIES OF MERCHANTABILITY OR FITNESS FOR A PARTICULAR PURPOSE, and we shall in no event be liable for any damages (indirect, consequential, or otherwise) that may occur as a result of a product application.